Are you looking for custom invitations without spending more than $700? The average cost of wedding invitations and answer cards is $ 659, according to 2010 figures from the Bridal Association of America. I just created two sets of wedding invitations including a reply card for less than $200 for a client. This post is exactly how I did it.
My friend Erin is getting married in September and has written some posts on my blog about her wedding-planning process. In exchange, I helped her order custom wedding invitations on the cheap.
Erin and her fiancé Eric are having an out-of-state wedding where Erin is from, and a local reception where the couple lives now. So she needed two sets of invitations. Along with the formal wedding invitation she wanted to include an RSVP card, as etiquette says not to include that information on the invitation itself. The second invitation matched the look of the main invitation but was a smaller size and more casual in format.
Establishing the Look
Erin already had a look & feel in mind that she wanted for her cards.
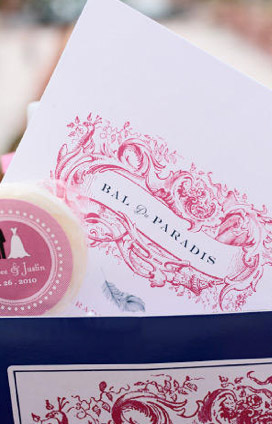
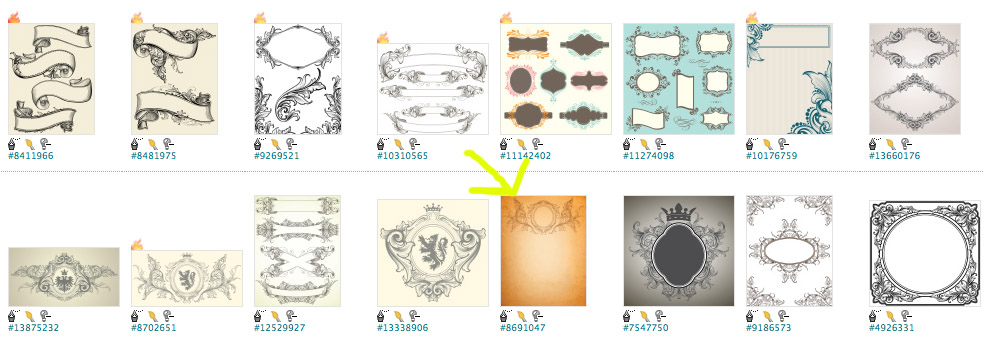
I took her inspiration images and found several stock photos that matched or complemented the look. When you order a vector or illustration you can change and manipulate the colors and the layout. She chose the image with the yellow arrow pointing to it.
Finding Graphics & Fonts
I found the image on iStock for 20 credits (credits cost as little as 95¢ USD/credit when you Google for coupon codes). I already had the credits in my account since I use it on a regular basis.
Some other sites in addition to iStock you can search for stock illustrations and graphics:
- Veer
- Shutterstock
- Stock.XCHNG
- Thinkstock
Find images or vectors similar to the ones used above.keywords like:
- Swirl
- Scroll
- Vintage
- Invitation
I looked at wedding invitations online to get a feel for how to design the typography. I mixed a swirly font (serif) with a formal straight font (sans serif) that looked similar to an invitation I liked.
Here are some sites where you can find free fonts:
- DaFont.com
- 1001 Free Fonts
- UrbanFonts.com
Designing the Invitation
I used Adobe Illustrator to manipulate the image and to match the colors she wanted (navy and pink). You can also use Photoshop or some other desktop publishing software like:
- OpenOffice (free)
- PagePlus (free)
- Print Shop Pro
- CorelDraw Essentials
- Microsoft Publisher
You can also use Microsoft Word.
(I sized the invitation according to one of the standard printing sizes like 4×6″ or 5×7″, then adjusted the size according to the printer we found and the price point we wanted.) I center-justified the text and matched the color with the stock image I manipulated.
Once we finalized the wording (see this site for help) I exported the files as PDFs and began shopping for an online printer.
Choosing a Printer
There are many online printers that are cheap. Some offer wedding invitation templates, and if you feel you don’t want to try designing invitations yourself and you don’t have access to a designer, this is the way to go. Here are several sites that offer nice templates to customize:
- MyGatsby.com
- Zazzle.com’s invitation section
- Bedbathandbeyond.com’s invitation section
- Weddingpaperdivas.com
- 123print.com’s invitation section
- Minted.com
Since we had an original design, we simply needed a printer that specialized in invitation printing so we were sure to get the type of paper we needed.
Here are several you could check that give you online quotes:
- PsPrint.com
- SmartPress.com
- VistaPrint.com
- PrintingBlue.com
I’ve personally used PsPrint.com for many of my clients’ projects, but not often for invitations. I had never used Smartpress.com before, but we chose it due to price and the type of papers it offered. I requested a paper sample kit so Erin could see exactly what type of paper she wanted. I highly recommend doing this.
Here’s what the quote was shaping up to be with the initial online quote:
WEDDING INVITES
200, full color front, blank back + envelopes
smartpress.com
$74.40
(The paper weight is 80# cover (thick). I chose “linen” as the paper type for the quote since it’s a classic go-to paper but it’s a little more expensive. there are lots of other nice paper options. they also have the option of doing rounded corners for about $8 more. i think that might be cool.)
2ND INVITE CARDS
100, 4X6.25 cards + envelopes
$44.19
(I chose a premium matte paper for the quote. same 80# thickness though. still have option for doing rounded corners for a few dollars more.
The prices reflect a 25% discount. It says it’s a limited-time offer but sometimes printers run specials like that for a long time or offer them as promo codes even when they’re not running a sale.)
After seeing the paper samples, Erin chose Felt Weave 80# cover thickness, which was cheaper than the Linen finish and I think looked even better; plus it allowed her to order the custom rounded corners that she really wanted. It gave the invites such a nice finished look.
The paper came in bright white, soft white and natural, and she chose soft white, which had some cream color in it.
Another Money-Saving Tip
We then added an RSVP card the size of a business card and matched the paper and rounded edges. Since the RSVP was a web address, there was no need to make the RSVP card postcard size to return, so she saved money by reducing it to business card size and she didn’t have to pay return postage or include an extra envelope.
Erin used the site ProjectWedding.com for her free wedding website where she could track RSVPs, but there are other sites that offer this service as well.
Placing the Order
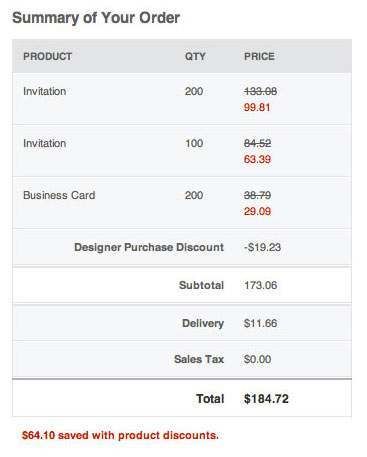
In all, Erin got two sets of wedding invites (200 of the main wedding invite and envelopes, 200 RSVP cards and 100 of the local reception invite and envelopes) for $184.72. (And when you make the cost factor.illustration used in the invitation – which was about $20 – it was close to $200 total.) The site was running a 25% discount on invitations, and I signed up for a designer account, which when approved, gave me a coupon code toward my first purchase.
When using a new site, always sign up for newsletters or free loyalty accounts, and of course search online for coupon codes.
Allow a week turnaround for printing and delivery, and keep in mind that it’s customary to send the invitation six weeks before the ceremony.
Final Thoughts
We only regretted that the envelopes were not paper like the invitations and felt cheap. The “soft white” color was not the same as the whiteness of the envelopes, so beware of this is you order from them, and any other online printer that includes envelopes automatically. If you ordered the high-end paper like metallics, they did have envelopes to match. If that detail is important to you, you might have to order somewhere else or purchase your own paper and matching envelopes and send to the printer to use (this is an option with several printers).
But Erin was still happy overall, and we agreed that the envelope is what people throw away. The invitation is what they’ll remember. And Erin added a really cool touch to her invitations to ensure that it wasn’t quickly tossed. On the back on the wedding invitation we professional engagement portrait session included a photo of her and Eric. It is beautifully printed and now her friends and family have a picture they can keep of the couple. The cost of printing on the back was nominal, and it saved a considerable amount of money by not having to make the pictures separately.
Well done, Erin!
(I did not receive financial compensation for recommending or mentioning any company or product in this post.)